[ad_1]
Here’s an easy black eyed peas recipe: made two ways! Try them creamy as a side dish, or cook them up for salads and dips. Either way, they’re absolutely delicious.

Are you a lover of black eyed peas? This mighty legume is full of plant-based protein and nutrients, and it can be eaten in so many different ways. You can usually find black eyed peas canned at the grocery store, but it’s cheaper and tastier if you cook them from dried!
Here’s my favorite versatile black eyed peas recipe: you can cook them until they’re just tender for salads and dips like Texas caviar, or make them into this creamy, smoky side dish. You choose!
Why You’ll Love This Black Eyed Peas Recipe
Black eyed peas are not really not peas at all: they’re beans! They’re part of the legume family with black beans, chickpeas, and peas. You might first think of them as the cuisine of the American South, but they originated in Africa and are eaten all over the world.
A popular black eyed peas recipe in the US is as a lucky New Year’s Day tradition: Hoppin’ John, a dish with rice and pork. But there are so many other ways to serve them, like dips and salads. This black eyed peas recipe is versatile enough to be served two ways:
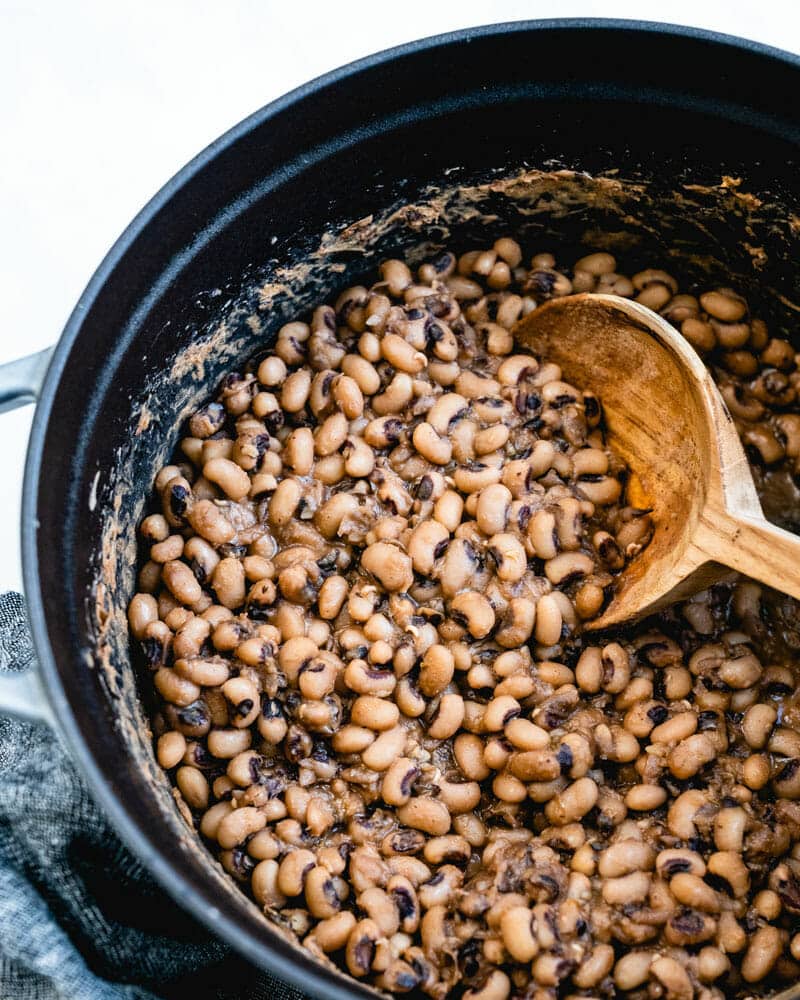
- Creamy side dish: The creamy side dish is my favorite: the black eyed peas break down into a creamy sauce that tastes rich and smoky. No bacon needed. It’s so delicious!
- Cooked for use in salads or dips: You can also use this recipe as a guide for how to cook black eyed peas for salads and dips. You’ll cook the beans for a shorter time and drain, then use them in dip recipes like Texas caviar or salads like black eyed pea salad.
How to Cook Black Eyed Peas (Basic Method)
Here’s the basic method for how to cook black eyed peas (or go to the recipe):
- Place 1 pound dried black eyed peas in a large pot with broth, water, and salt.
- To use in salads: Cook 40 to 50 minutes until just tender, then drain.
- To serve as a creamy side dish: Cook 55 to 60 minutes until very tender and starting to break down. Add the garlic, smoked paprika, oregano, onion powder, and butter, and stir vigorously the water in the pot until it turns into a creamy sauce.

Alternate Method: Instant Pot
Got a pressure cooker? This black eyed peas recipe is even easier in the Instant Pot! It makes for even more tender, creamier beans. The cook time is slightly less than stovetop, and it’s a totally hands off method. Go to Instant Pot Black Eyed Peas.

Flavor Secrets for Seasoning
If you make the side dish version of this black eyed peas recipe, here are a few more notes about making the creamy sauce:
- There will be extra liquid: this creates the sauce! When the peas are done cooking, you’ll notice quite a bit of liquid left in the pot. As you stir, the beans will break down and form a creamy sauce.
- The secret flavors: garlic, oregano, onion powder and smoked paprika. These spices add big flavor. If you can, try to find smoked paprika: the smoky undertone it adds is irresistible. If not, you can substitute standard paprika.
- A little extra butter takes it over the top. These black eyed peas taste great on their own, but to amp the flavor even more, add a little butter.

Storage Info
If you cook the black eyed peas and keep them whole for salads and Texas caviar, you’ll only use a portion of them. Here’s how to store the remaining peas:
- Refrigerator: Store the leftovers in the refrigerator for 3 to 5 days.
- Freezer: Freeze for up to 8 months. Place the drained black eyed peas into a sealable storage container like a mason jar. It’s helpful to freeze them in 1 ½ cup increments, which equals 1 15-ounce can.
Dietary Notes
This black eyed peas recipe is vegetarian, vegan, plant-based, dairy-free, and gluten-free.
Easy Black Eyed Peas Recipe

Here’s an easy black eyed peas recipe: 2 ways! Try them creamy and smoky as a side dish, or learn how to cook them for salads and dips.
- Prep Time: 0 minutes
- Cook Time: 45 minutes
- Total Time: 45 minutes
- Yield: 8 servings or about 7 cups 1x
- Category: Essentials
- Method: Stovetop
- Cuisine: American
- Diet: Vegetarian
Ingredients
For the black eyed peas
- 1 pound dried black eyed peas
- 1 quart (4 cups) vegetable broth
- 4 cups water
- 1 ½ teaspoons kosher salt
For the side dish flavoring
- 1 small clove garlic, grated
- 1 teaspoon smoked paprika
- 1 teaspoon oregano
- 1 teaspoon onion powder
- 2 tablespoons butter, optional (or use vegan butter or coconut oil)
Instructions
- Add the black eyed peas, broth, water and salt to large pot and bring to a boil. Reduce to simmer. Then go to Step 2 to 3.
- To keep them whole for salads and Texas caviar, cook them 40 to 50 minutes until just tender but they still hold their shape, then drain. Serve immediately or refrigerate for up to 5 days. You can also freeze for up to 8 months. Place the drained black eyed peas into a sealable storage container like a mason jar. It’s helpful to freeze them in 1 ½ cup increments, which equals 1 15-ounce can of beans.
- For the creamy side dish, cook 55 to 60 minutes until very tender and just starting to break down. If the beans start to appear before becoming tender, top off with water to keep the beans just barely submerged. At the end of cooking there will still be a good amount of water: you’ll use this to create the creamy sauce. Add the garlic, smoked paprika, oregano, onion powder, and butter (optional), then turn up the heat and stir vigorously for a few minutes until a creamy sauce forms. Serve immediately or refrigerate for up to 5 days.
More Legume Recipes
Legumes are full of plant-based protein and great for making filling vegetarian and vegan meals. Here are some master methods for making recipes with beans and peas:
- How to Cook Black Beans
- How to Cook Chickpeas
- Homemade Refried Beans
- Borlotti Beans
- Cannellini Beans
- White Beans


[ad_2]
Source link